How It Works by Dr. Dyno, American Iron Magazine, June 2006
Dyno Dos And Don’ts, II
The jetting dilemma and air-to-fuel ratios
SHORTLY AFTER THE FIRST VERSION OF DYNO Dos And Don’ts was published in the April 2003 issue, I upgraded my dyno with Dynojet’s air-to-fuel ratio module. Although I did it primarily for tuning fuel-injected bikes, I saw the immediate benefits on carbureted models — starting with the first bike I tested. But before I go any further, some discussion of proper air/fuel ratios is in order.
|
I recently read an article, which touted the optimum 14.7:1 air/fuel ratio. Due to their tuning efforts, this was achieved at full throttle across the engine’s entire rpm band. The air/fuel curve, along with the horsepower and torque graphs, were printed in the article to prove it. However, this is not the best ratio for optimum power. Now, a common response, one that I hear almost every day, is “But everybody knows that 14.7:1 is the perfect stoicah-something ratio, isn’t it?” Yes, the perfect stoichiometric efficiency in a gasoline engine is when the air and fuel ratio is at 14.7:1, with 14.7 parts air to one part fuel. This is when the products of gasoline and air combustion — hydrocarbons, carbon monoxide, and nitrogen oxides — are all at their combined lowest levels.
Kind of sounds emissions-related, doesn’t it? It’s the ratio only a catalytic converter could love, a save-the-planet number. Since the early 1980s, our cars and trucks have had exhaust oxygen sensors as part of a closed-loop EFI system to continually zero in on a 14.7:1 air/fuel ratio for the most complete fuel combustion possible. The upside of this, which is becoming more important every year, is better fuel economy. That makes 14.7 a save-the-doc-some-bread number and it works for me. When all bikes go the way of California emissions levels, we’ll all have oxygen sensors on our pipes.
It’s important to note that 14.7 applies
only to part-throttle and cruise conditions.
That is, after all, where our cars,
trucks, and bikes spend most of their
time, and, therefore, potentially produce
most of their emissions. Until an engine is
fully warmed up, a richer mixture is
required. During this phase, the oxygen
sensors, if any are present, are ignored,
and the engine is fed a richer mixture.
How rich is determined by the
enrichener circuit in a carburetor
or the warm-up program in the
fuel injection computer running
in open-loop mode. However, we
can forget about 14.7 when we’re
looking for maximum power at
full throttle on a race bike. It takes
a considerably richer ratio to
smooth out those horsepower and
torque curves and push them
upwards on the dyno graph.
While there is no specific magic
number here, most engines produce
maximum power at ratios in
the 12.5 to 13.5:1 range. When tuning
Harleys, we’re typically targeting
13.0 to 13.2 throughout the
rpm band at full throttle. Guys
that tune an engine to 14.7:1 don’t
do anyone any favors in the power
department. While 14.5 to 15.0 is a
good ratio at partial throttle, they
probably lean out the engine to a
sluggish 16.0 or worse under
cruise conditions, which may put
the motor on the edge of lean misfire,
detonation, and, eventually,
expensive engine damage.
ONLY A TUNING AID
While seeking these specific ratios, we need to keep in mind that air/fuel ratios are only a tuning aid. Maximum horsepower and torque, especially in the riding range, are the goals. As if on cue, just the other day a guy e-mailed me a graph of a carbureted 95" Twin Cam with a perfect, straight-as-an-arrow 13.2:1 air/fuel ratio curve. That’s very difficult to achieve with a carburetor, and I must say I was impressed — that is, until I looked at the horsepower and torque curves. The bike was making no better power than a stock cam-equipped bike, even though it was running one of the best cams available. I suspect the bike had too much exhaust backpressure. But at least the operator printed the air/fuel curve. I’m finding some dyno operators using the only-a-tuning-aid reasoning as an excuse to avoid ever printing or showing the customer an air/fuel curve. I’ve even heard of one who doesn’t even use his air/fuel sniffer on carbureted bikes.
Here’s the problem: Very few customers know what horsepower or torque their bikes should be making, let alone what the curves should look like. The curves are at least a little, and usually a lot, different for every bike. The air/fuel line, on the other hand, should be nearly identical from bike to bike. With a straight red-dashed air/fuel target line displayed across the screen, everyone becomes an instant dyno-tuning expert. Heck, even my 4-year-old granddaughter could look at an air fuel line on the screen and say, “Hey, Grampa Dyno, how come that (air/fuel) line has those huge wiggles in it? And why is it so way far off from that red (target air/fuel) line with all the holes in it?”
Oftentimes, it’s a simple matter of time and money. If the dyno operator knows the air/fuel curves will likely raise questions he can’t answer or issues he doesn’t want to take the time to explain, he’ll try to avoid letting the customer see them. As we’ll see later, this is particularly true on carbureted bikes without enough backpressure. The easiest way to avoid the whole issue is to not even measure the air/fuel ratio. Just assert your years of oldschool tuning experience done before air/fuel testing became available — a slick way to sidestep the issue that better tuning equipment should result in better tuning. The same operator will likely play a different tune (literally) on a fuel-injected bike where an ugly air/fuel curve rings the cash register as he sells that customer a severalhundred- dollar EFI tuning device, and then hits him for a few hundred bucks more for installation and tuning.
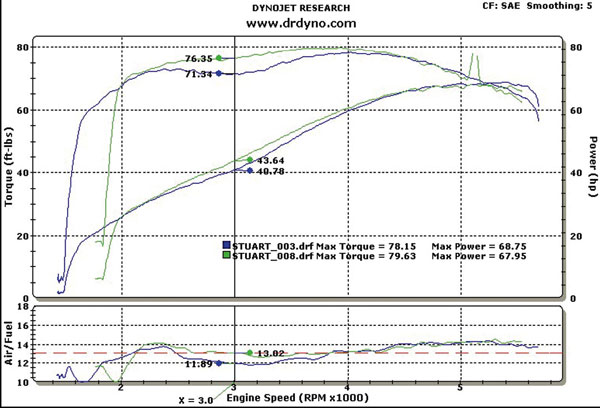 After two warm-up runs, we got accurate torque, horsepower, and air/fuel readings (the blue lines). Since I always look at the midrange torque first, my eye was immediately drawn to the slight torque dip at 3000 rpm (70 mph in fifth gear). In a pattern that I would see repeat itself many times, the air/fuel curve also dipped rich in the same area. |
MAIDEN A/F RATIO TESTING
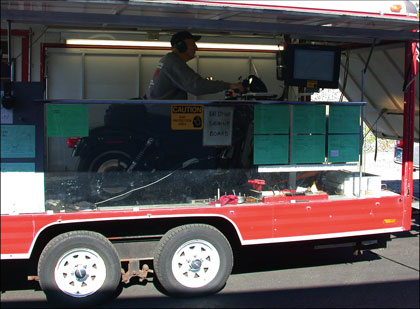
Okay, now back to the first race bike I tested using my new air/fuel module. On the promise of a free dyno test and tune, Stuart, the owner of a carbureted 2003 Night Train, brought the bike over from just down the street. (Since I’m on the edge of a neighborhood, I run very few bikes at my house. I asked Stu how loud it sounds at his house when I do run one. He said he can barely hear it inside his house but outside it does sound much better — a true gearhead.) The bike is stock except for a high-flow air cleaner and popular-brand 2-1/4" pipes with baffles. After two warm-up runs, we got the blue torque, horsepower, and air/fuel lines reading from top to bottom. (Ignore the curves below 2000 rpm where I rolled the throttle on at two different rpm.) Since I always look at the midrange torque first, my eye was immediately drawn to the slight torque dip at 3000 rpm (70 mph in fifth gear). In a pattern that I would see repeat itself over and over, the air/fuel curve also dipped rich in the same area.
Stu’s analysis was that we’d need to lower the slide needle to lean the midrange and go up on the main jet to richen up the high end. This is a fallacy that’s based upon the standard approach that the idle circuit controls idle and offidle mixture, the slide needle position (or intermediate jet) sets the midrange mixture, and the main jet takes over at full throttle. There’s nothing wrong with that theory, but it applies to throttle opening percentages, not rpm bands at full throttle. There’s a big difference.
Since, in this typical dyno test, I’m already at full throttle by 2000 rpm, the main jet controls the whole band from there up. Changing the main jet will move the entire air/fuel line up or down, but which way do we need to go? A leaner main jet will help at 3000 rpm, but it will also push the already marginally lean 4500 and higher top end mixture even leaner. Conversely, richer main jetting will help at top end, but knock down the midrange torque and push more unburned fuel out the pipes. It’s the jetting dilemma, and the reason many dyno operators don’t want you, the customer, to see the air/fuel graph. They can’t jet around it; it’s all a compromise. And this is a mild example with only two points of air/fuel variation. Once you get away from the stock cams, it only gets worse. I’m talking four or more points of mixture variation!
SOLVING THE JETTING DILEMMA
I always test and display air/fuel ratio as part of my baseline set of tests. To be fair to other dyno operators, I believe that with everything else being okay, an air/fuel ratio curve bounded by the 12:1 and 14:1 gridlines is acceptable on a carbureted Harley. That’s my personal no-tuning- needed criteria. The trouble is, our bike also has the beginnings of the infamous torque dip I’ve been seeing for years. So why not fix it the way I always have, by pulling out another set of magic TorqueTuners and adding some backpressure? Stu didn’t mind his race bike being a few db louder, so I pulled the baffles before installing the TorqueTuners. With the attack angle properly adjusted, the rich dip in air/fuel curve is history, with the line being nearly ideal from 2500 to 4200 rpm (55-100 mph).
And look what happened to the torque: A nice increase across the same band with a 5-ft-lb. (7 percent) gain at 3000 rpm. A little more free (really free for Stu) power with a little less fuel. That’s solving the jetting dilemma without touching the jetting. For years, every time I’d fixed a torque dip, I was also improving the air/fuel ratio without knowing it! Now the benefit in both areas can be measured.
I could fill page after page with similar graphs, some about the same as Stu’s and some so rich in the midrange that the air/fuel line goes down to 10:1 rich and just lies there until coming up a little just before the rev limiter! Most of them are all solved the same way, by exhaust tuning and then jetting if needed. Much of the same will also apply when we delve into fuel injection tuning in a future article. Let’s wrap up this carbureted section with a different (and drastic) slant on the same theme.
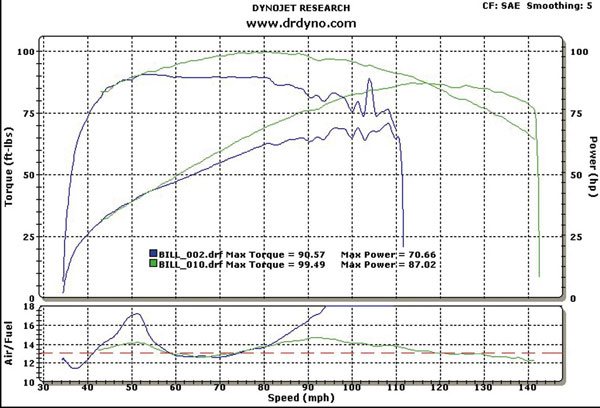 The Before Run (blue lines) shows the engine is literally starved for fuel above 4500 rpm. As the air/fuel ratio graph reveals, where I typically see richness, someone had jetted it lean enough to be nearly spot-on between 60 and 80 mph in fifth. The resulting torque curve must have felt okay: 90 ft-lbs. and no dip. However, the horsepower hit a near-stock 70 before the fuel went away. The After Run (green lines) shows a perfect torque curve that kisses 100 ft-lbs. of torque, and a horsepower graph that pulled right to 6200 rpm with a peak at a solid 87 hp. Note that the air/fuel curve stayed exactly the same from 60 to 80 mph, but the torque now rises from 90 to 100 ft-lbs. in the same area. |
SOME BIKES YOU REMEMBER
If you’ve been following me so far, you should have seen a trend. A too-open exhaust system causes a dip in both the midrange torque and the air/fuel curve. The hotter the cams, the worse the torque dip gets and the richer the air/fuel mixture goes. So what would happen if an openexhaust, big-cam bike was main-jetted lean enough so that it actually ran close to a 13:1 ratio in that normally rich midrange area? Such was the case with Bill’s bike, another 2003 Night Train racer.This one had a 95" kit with mufflers that I knew were too open, and a cam “a little bigger than the builder normally puts in,” according to Bill. A high-flow air cleaner and a “reworked” stock carb rounded out this surprise package. Another clue was Bill’s warning that I’d have a hard time restarting it if it stalled after idling too long. He also said it had a 6200-rpm rev limiter. I stopped the baseline test with the second run (blue lines) because I couldn’t get it over 4500 rpm before it literally starved itself for fuel. The super-lean section at roll-on explained the hard restart issue.
I shut it off and gave Bill the good news and the bad news. I could fix it and he’d have a new bike when I was done, but he’d spend a fistful of cash to do it since it was the worst-running Twin Cam I’d seen in several years. He knew it had some issues but didn’t think it was that bad. The bike was only ridable because, as the air/fuel ratio graph reveals, where I typically see richness, someone had jetted it lean enough to be nearly spot-on between 60 and 80 mph in fifth. The resulting torque curve must have felt okay: 90 ft-lbs. and no dip. And the horsepower also hit a near-stock 70 before the fuel went away. The bike probably ran acceptably, but had he tried to keep it at a steady high rpm for any length of time, he’d have damaged the engine.
After getting the go-ahead, I told him we had a long way to go and that things would get worse before they got better. It was one of those you-may-not-want-to-watch jobs. I drilled holes in the pipes and installed the TorqueTuners. I also had the carb off the bike to bring it back to stock using the stock needle and emulsion tube. I had to jet it three (or was it four?) times. An hour and a half later, we had (green lines) a perfect torque curve that kissed 100 ft-lbs. of torque and a horsepower graph that pulled right to 6200 rpm with a peak at a solid 87 horsepower. Note that the air/fuel curve stayed exactly the same from 60 to 80 mph, but the torque now rises from 90 to 100 ftlbs. in the same area. Tuning this beauty would have been nearly impossible without the air/fuel module to sort things out each step of the way. Like so many other owners, Bill finally had the power the builder promised him. After all, the right parts only work right if they’re tuned right. AIM